Going back in time, the one time I had a non Japanese AVR for my home theater was way back in 1997 when I was using a Sherwood AVR with a pair of TDL RTL3SE and some unknown KH rear speakers with no center channel nor a subwoofer. What can I say, limited student budget :). Even that, we fellow students in Brighton enjoyed a surround sound with the top of the line SONY DVD player. However, as I progressed in life, I had the opportunity to experience ARCAM as well. Quite delightful processor. When I return to Malaysia, the market was dominated by Yamaha, Onkyo and Denon. The names like Lexicon, ARCAM, Bryston etc , one needs to really indulge into serious HT set up to start seeing this names to reside in our house as its only sold by specialized shops. The Japanese brands however, can be purchased from most chain electronic shops like Harvey Norman, BEST Denki, DHT etc.
From 2001 till now, I went through 2 Yamaha and 1 Denon AVR. Went through the evolution from DVD DD and DTS to being among the first to adopt Bluray in Malaysia in 2007 and then 4K ATMOS in 2016. Somehow, I have settled into the Japanese Home Theater environment....
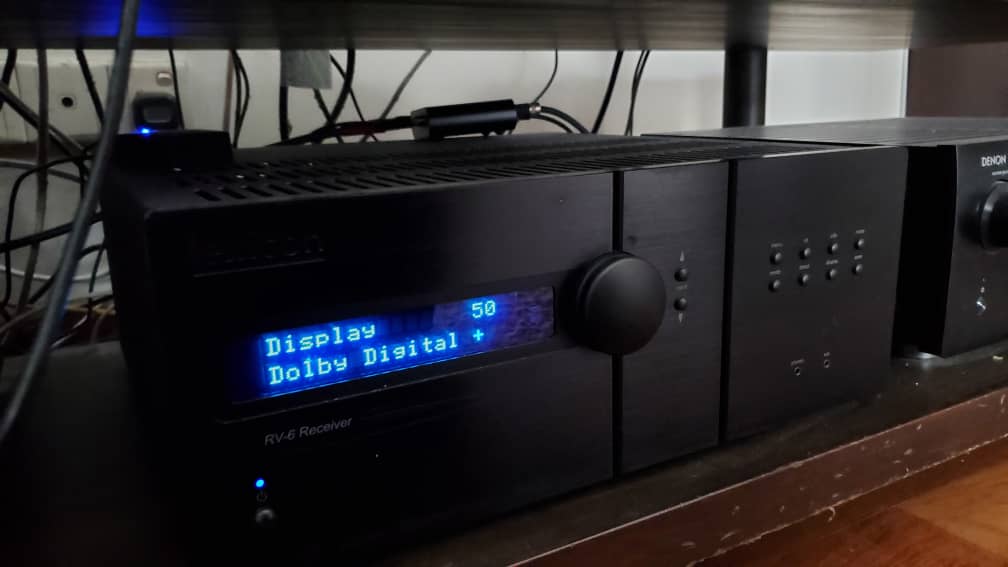
..................... until I was introduced to Lexicon RV6 by AV Designs a couple of months ago.
Yes , I am actually a movie buff but I rarely do reviews on HT equipment because of a few reasons:
It does take some time to calibrate the sound
A lot of re-cabling to do - Oppo 4K player, Astro, Apple TV, Samsung 4K player, PS4, Subs and speakers
My setup is in th family living room upstairs. Not a proper enclosed dedicated HT room.
But with this RV6, it was worth the time spent with James Tan of AV Designs to really understand and enjoy what this unit can do.
SPECIFICATIONS
The RV6 does not fall short when it comes the specification. Some of the key features to me is listed below:
Logic7 Immersion natural sound up mixer
Dolby ATMOS and DTS:X 7.1.4 decoding
DTS Virtual:X
Dolby Vision compatible
ARC compatible
Dirac Live for Lexicon room correction
Lexicon AV Control App
7 channel driven at 90 watts (don't panic yet :)
Spotify compatible (TIDAL would be good if they can do it)
The front fascia is is such a simple and minimalist design. A small blue LED screen that shows input and audio format, up and down input selector button, volume knob and a few key features buttons. Also available is a headphone jack and audio input jack.
On the rear, most AV enthusiasts will be happy with the 7 HDMI inputs and 3 HDMI outputs with ARC. It offers pre outs for each channel if you feel you need more power for your set up.
There are also analogue audio RCA inputs and digital inputs as well if you would like to use the Cirrus DAC available in this unit.
The unit is beautifully finished and looks classy compared to a typical AVR with lots of lights and switches.
The remote control is similar to my ARCAM CDS50 SACD/Streamer unit. Easy to use for the basic features for this unit with backlight feature as well. I recommend to download the Lexicon AV Control App available for iOS and Android to have a more modern feel in controlling the unit.
CALIBRATION
AV Designs was kind enough to fully calibrate the system for this review. The last calibration I did was with my Denon 6 years ago using an Audyssey microphone and some subwoofer crawling. James and his colleague took about 2 hours to complete everything with one subwoofer placed in front and another in the rear of the room via a wireless transmitter. Do note that my own set up was actually a 5.1.2. An additional sub was introduced for this review.
THE SET UP
Oppo UDP205, NETFLIX, Apple TV
PMC Twenty.23 and C - LCR
SVS PRIME rear speakers
SVS Elavation speakers
SVS NSD12 subwoofer
JBL subwoofer (added for the review)
THE SESSION
I re-watched quite a number of movies over the past 2 months. Justice League, Superman, Jurassic World. Metallica S&M2 concert etc using Oppo BD205, NETFLIX, Apple TV, ASTRO UHD. Each and every device is fully compatible with RV6. One small glitch that happens now and then is the ARC from my new SONY TV when playing NETFLIX. Sometimes, the audio will revert to the TV instead of the RV6. Have to restart the TV and sometimes the audio data does not comes out on the RV6 display. Small glitch but I am sure a better HDMI cable could fix this.
For the overall review, I opted for Star Wars Episode 3. In these 2 samplers, I hope readers can get an idea of what kind of experience you will get having an RV6 in your system.
Scene 1 - The Death of Count Dooku
The swaying of light sabers with the RV6 sounds meatier compared to the thinner sound that I am used to. It had more life to it. Every hit of the sabers created an impact to my listening pleasure. The dialogue through my center channel also sounds crispier with high clarity. Just listen to the dialogue between Anakin and Count Dooku in this sample. The immersive experience of the surround and ATMOS delivered by the RV6 is simply giving more engagement to me.
Scene 2 - Yoda vs Darth Sidious
A similar experience here with the light saber and dialogue. Yoda's growling voice sounds really convincing and so does Darth Sidious. The rumble of the Senate's floating seats were also very impactful. The way the low frequencies were channeled to the 2 subwoofers was simply remarkable. Do note that even though the RV6 have 2 sub outs, the device does not split the channel. A device had to be installed to ensure 2 subs can be used with a greater impact. You can discuss further with James if you require 2 subs. The background score during this duel sound huge and gave the right engagement level to be immersed in this scene. Full of life.
THE CONCLUSION
Overall, Lexicon gave me a complete different experience (even compared to my previous ARCAM, Sherwood AVR). What is the difference you may wonder right? Firstly, the level of engagement with what I am watching. It really pull me more towards having a livelier cinematic experience. I attribute this mainly due to its level of clarity, There were moments that certain effects were brought up on channels that I did not experience before. Sounds cliche right but that is one of the key differences I experience with this Lexicon.
Second, my subwoofer as well sounded more engaging and giving me real impact. Do note that the secondary subs is just a small JBL sub coupled with my front SVS sub.
This RV6 is one AVR that focuses entirely on sound quality. The physical design although beautifully finished, Lexicon opted for a simple and minimalist design. Yes you get Spotify Connect for your music pleasure but I am quite sure that is just an attempt to go along with the market.
If you are into getting a new AVR or purely want to hear to something different than Yamaha, Denon, Marantz, please contact AV Designs for a demo of either this Lexicon RV6 or its bigger brother RV9.
H-2-6, Block H, Boulevard Business Park, No. 115, Jalan Kepayang 51200 Kuala Lumpur, Malaysia
Yes. A few weeks ago, I was bitten by the iFi Phono bug. I just could not believe how something so small and relatively cheap and affordable can offer such amazing analogue feeling. The bug now continues on the digital side where E1 is kind enough to loan me the whole shebang of iFi ZEN DAC and CAN headphone amp together with a Sennheiser HD660S. Talk about the complete package.
Rather than a typical review of how the DAC and CAN perform, I will bring you along a journey of which you can enjoy an upgrade path whenever your pocket allows it. For headfi, I usually do not bother thinking of an upgrade path within the same design or model. It was usually straight from one DAC or headphone amp to another model. But there is something special about these ZENs. Read on folks!
THE SPECIFICATION
Equipped with Burr-Brown True Native® chipset, the DAC is claim to be retain the file format and produce it bit perfect. It supports PCM and DXD up to 32 bit/384 kHz, DSD256 and lo and behold, the precious MQA. For yours truly, only MQA is what I have yet to truly experience it. The rest, its kind of over saturated in the market nowadays and for me, I have been into hi res audio for more than 10 years now, way before it became more mainstream nowadays. But MQA is what I really look forward to.
There are debates going around on is it truly MQA. One needs to understand the whole MQA format so that you can really know what your MQA enabled equipment can do. For this model, it is actually an MQA renderer and will require external software such as TIDAL to perform the decoding.
It also carry the PowerMatch feature to match your headphones and IEM. On the rear, it also offers a pair of RCA line outs to either connect this DAC to a power amp/active speakers or with a flick of a switch to Fixed output, turn this DAC into a standalone DAC for your hifi.
As for the CAN, it is a fully discrete and balanced amplifier and offers a 4.4 mm balanced connection. It runs on Class A discrete circuit that came from their flagship model Pro iCAN, that costs 11 times more. It also comes with Xbass® analogue bass correction system that corrects any missing low freq response. Another special feature is its 3D Holographic® dual analogue matrices that places the artist with you in the room, not in your head. Interesting! There is also a feature to choose the appropriate gain to match your headphones.
I will not bore you readers with the full specs as they are available on iFi website.
THE UPGRADE PATH
Rather than choosing too many different type of music, I am using only 2 reference tracks but with various set up as follows. Source is the Sony Walkman and choice of headphone is my reference Sennheiser HD800S and Beyerdynamic T1.I decide to use my HD800S instead to really challenge this combo as I have heard so many good feedback with HD660S.
DAC on unbalanced 6.3 mm without iPower
DAC on balanced 4.4 mm (HD800S only) without iPower
DAC on unbalanced 6.3 mm with iPower
DAC on balanced 4.4 mm (HD800S only) with iPower
DAC + iPower connected to CAN and on unbalanced 6.3 mm
DAC + iPower connected to CAN and on balanced 4.4 mm
Catch my drift here when I say there re many upgrade path you can take with these?
CONNECTIVITY
The DAC only have 1 input which is the USB. No compatibility issue with my SONY Walkman, Samsung FOLD and even my SONY HAP Z1 ES hi res player. The only thing is, only the SONY Walkman streams out the MQA to the DAC. The Samsung needs an app to allow this to happen.
The DAC also have no issue decoding any resolution you feeds it. DSD, 24/192 FLAC, WAV, MP3 etc. You name it and the DAC can play it.
THE TRACKS
As I mentioned, I am only using 2 tracks to test the combo and experience the upgrade path
What A Wonderful World - Louis Armstrong (MQA)
Take Five by Dave Brubeck on DSD
DAC on unbalanced 6.3 mm without iPower
I first hook up the HD800S. While it was still enjoyable, I do feel that the HD800S does not match well. Something was missing with the overall presentation. Playing What A Wonderful World sounded a bit flat with less emotion can be experienced from the deep vocal of Louis.
It was a similar experience playing Take Five. There were certain instances where the the DAC can give a good kick the HD800S but most of the time, the overall presentation was leaning on the flat side of things.
It felt more engaging with the Beyer T1. The overall presentation sounded more natural and also well defined. The instrument playing with Louis sounded more airy and also a certain level dynamics started to kick in.
With Take Five, the DAC gave the T1 quite a workout on the percussion and double bass. Quite musical to be frank. The bass digs deep quite decently with the thumping of the snare sounded dispersed.
DAC on balanced 4.4 mm (HD800S only) without iPower
The deep growling vocal of Louie sounded deeper than using the unbalanced 6.3 mm cable. The intro of this evergreen track sounded soothing with a very spacious ambient. The various instrument playing gave me a chill as it is very mesmerizing. The wire brush percussion can be clearly heard. Given that this HD800S is known to be a difficult headphone to drive and picky with the amp or DAC, I am quite please to hear what I hear. It does show little signs of restricted sound but still acceptable.
On DSD file, the DAC worked quite well with the HD800S. The bass was extensive on Take Five. It provided a natural sounding and thumping of the percussion and double bass. The wind instrument sounded airy and more spacious than an MQA source despite it is not the same song.
DAC on unbalanced 6.3 mm with iPower
Hmmmm.... quite surprised how much having a dedicated power supply can change things. Apparently the iPower does reduce noise I suppose having to hear a slightly more dynamic sound from the HD800S. Louis vocal started to be more expressive and also the overall song sounded more airy and livelier. More fluid than when the DAC was drawing power form the SONY Walkman.
This is also true with Take Five. The DAC gave the HD800S a good shaking with the double bass and percussion. The sax also sounded sweeter. I can only summarize it as more music was coming through the HD800S when the DAC is used with the iPower.
Switching to T1, the improvement was even more evident. Bass was more refined and overall ambient the first track was soothing. Larger sense of space coming through the T1.
With Take Five, the DAC injected this track with a sense of dynamics that swings the overall presentation towards a more engaging presentation. It pulls me in to close my eyes and imagine this track being played live in front of me.
DAC on balanced 4.4 mm (HD800S only) with iPower
Now, connecting the iPower to the DAC gives slightly a cleaner sound to the HD800S on balanced cable. The deep vocal experience can still be heard but the impact was more on the fluidity of the music flowing through the HD800S. Less restrictive.
Now, I did play around with the PowerMatch feature and it does help a bit to smoothen the highs and made both cans more fluid.
DAC + iPower connected to CAN and on unbalanced 6.3 mm
With both the T1 and HD800S, the CAN drove it quite sufficiently. I find that the T1 is more forgiving compared to the HD800S with this ZEN iFi CAN. With the T1, the overall presentation was leaning more towards a warm and laid back sound while with the HD800S, the DAC and CAN combo presented a brighter sound experience.
DAC + iPower connected to CAN and on balanced 4.4 mm
This was a tricky one. The HD800S sounded the best a Zero dB Gain. A more relaxed and fluid sound from the CAN. The killer is that I had to drive the volume know up to about 12 o'clock to get the music sound livelier. But the sound quality is spot on. Increasing the gain on the CAN will only produce a harsher sound at a lower volume. So, I don't really recommend that.
THE CONCLUSION
If I am to rate each upgrade path on a scale of 1 to 10 compared to how much you need to spend and the improvement you get, it goes like this:
DAC with unbalanced headphone = 7
DAC with balanced headphone = 7.5
DAC with unbalanced headphone + iPower = 8.5
DAC with balanced headphone + iPower = 9.5
DAC + iPower + CAN with unbalanced headphone = 8.5
DAC + iPower + CAN with balanced headphone = 8.0
Certain consistent observation:
The DAC alone is a great piece of unit. The PowerMatch feature can help to bring out the peformance of your headphone to acertain level. Highest value for money here for RM 629.
The iPower brings in something special to the DAC, mainly on the dynamics and surfacing more musical details. This to me is the biggest change in sound especially its just RM 239 to have this extra ooommpph to your listening pleasure.
Moving to balanced headphone connection opens up the presentation slightly more but please ensure that the whole headphone design allows this and not just a matter of using an adaptor.
Adding the CAN will need proper matching with your headphones. Suggest to demo the CAN first before purchasing. Adding this will cost RM829 which will bring your complete stack close to RM1700. This is where you really need to ensure you have the right headphones to match this stack.
The only drawback of this combo is their combo choice of the front fascia, LED colour and fonts size and colour. You reaaaallly need to go close to the unit to figure out on which input you are on, which gain you are on etc.
So there you go folks. A complete upgrade path for your iFi ZEN headphone stack. For a demo, please contact E1 Personal Audio based in Sungai Wang.