Wednesday, 7 November 2012

Kingrex UD384 USB DAC and U Power

A long awaited review but I had to take more time on this unit due to its dual functionality.

When I was first contacted by Kingrex via email, I thought it was a friend of mine playing a prank on me. But when I looked at their website, I decided to reply their email and 3 weeks later, I received the UD384 USB DAC and its matching U Power battery based PSU.

So what is this UD 384? Its actually a 2 in 1 USB DAC and SPDIF convertor. The latter is meant for those with DAC that does not have a USB input. Similar function to Musical Fidelity V-Link and M2Tech SPDIF convertor.

The U Power is basically a PSU which comes with a built in rechargeable battery. It is claimed that it will then supply a more stable power to the UD384 DAC compared to the plug that came with the UD 384 DAC.

Built

Both unit are of the same size, makes it a good match. Its lightweight it fits easily in the palm. Given the size, it is actually quite a sturdy unit. I believe some basic engineering design was put in for the casing as it has sufficient weight plus 4 small rubber 'pads' installed underneath the units; to withstand movement when you placed it on the table. Even with my stiff Cambridge Audio interconnect, the unit did not move when I connect it to my set up/Bose speakers. The casing is made of aluminum with black hairbrush polish.

The 2 units can be stacked together making it look like a matching pair. It measures 88 x 82 x 24 mm.

The UD384 comes with a 3 pins UK ‘walmart’ power supply, A-B USB Cable and a thumbdrive which has the required driver for Windows, plus some music samples (well at least for the unit I received). Readers may be familiar with my particular dislike against those 7.5V power supply plugs but thats just me. The yellow power indicator LED is also very soft to the eyes.

The U Power comes with the same 3 pin UK power supply to recharge the battery, another power supply cable to connect from U Power to the UD 384 and a product manual. It has a switch to choose between supplying power to the UD 384 DAC or to recharge the battery. The green power indicator LED is also very soft to the eyes.


Connectivity

UD 384:

Input: 1 x Asynchronous USB B input

Outputs: 1 x pair of gold plated stereo RCA, 1 x SPDIF coaxial

U Power:

Input: NIL

Output: NIL (just 7.5 V out to the UD384 DAC)

Specification

The UD384 can direct stream from PC or Mac at 16 bit/44.1KHz to 32 bit/384KHz through analog output –RCA & digital S/PDIF output. The UD384 is running in asynchronous mode for best performance. The master clock generator is a classy 1ppm TXCO unit with proprietary low-jitter drivers for Windows & Mac. Direct Sound, ASIO4ALL, and WASAPI are all supported and run smoothly.

For the RCA output, it can handle sampling rates of 44.1 KHz, 48 KHz, 88.2 KHz, 96 KHz, 176.4 KHz, 192 KHz, 352.8Khz and 384Khz and bit rates of 16, 24 and 32.

Unfortunately, for the SPDIF output, it can only handle sampling rates of 44.1 KHz, 48 KHz, 88.2 KHz, 96 KHz, 176.4 KHz and 192 KHz and bit rates of 16 and 24 bit 2 Channel. For this particular section, I can confirm that as I connected the SPDIF output to my Musical Fidelity M1 DAC which can show the input signal.

Both of the outputs here can be used simultaneously. So, you can connect to a headphone amp and a DAC simultaneously, for example.

Setting Up
Connecting to my Mac and Macbook Pro was easy. Basically plug and play. No driver installation required (that’s why I am keen on Apple products!). Connect the UD384 via the supplied A-B USB cable and the Mac recognizes it and chooses this output automatically. No issues encountered using both iTunes/Bitperfect and also MPlayerX (for FLAC) on this unit.

Connecting to my Window Vista based Dell laptop was not quite straight forward. As opposed to my Naked USB DAC….., the UD 384 cannot be connected via my laptop docking station. My laptop just cannot detect the unit. Installation of the provided driver also could not be completed with an error message stating that there was a component missing. Kingrex have been informed of this issue. However, being an IT dummy, I just tried connecting the USB cable directly into my laptop instead of the docking station, and Voila, it detected the UD 384. Then the excitement started.

Another issue is that, as my laptop is about 10 ft away from my hifi set up, I had to use a long A-B USB cable (about 3 m in length). This is my usual set up when I connect my laptop to MF M1 DAC. However, using a long USB cable with the UD 384, it created a loud continuous clicking sound through my hifi set up via the SPDIF. Hence, for this review, I had to set up my laptop near enough to my hifi set up.

There are some settings need to be changed on the laptop sound output which are clearly explained in the UD 384 manual with a snapshot of the laptop instruction step by step.

Review Set Up

1. For the office use:

a. Hardware: Window Vista Dell laptop

b. Software: Window Media player for FLAC, iTunes for 320 kbps/48 kHz MP3s and WAV files

c. Speakers: Bose Companion II

d. Interconnect (UD 384 RCA to Bose speakers): Cambridge Audio 700 Series

e. Comparison: UD100 DIY ‘Naked’ DAC

2. For home use:

a. Hardware: Macbook Pro

b. Software: iTunes for 320 kbps/48 kHz MP3s and WAV files, MPlayerX for FLAC

c. Amplifier: Musical Fidelity M6i + M1 PWR power amp

d. Interconnect (UD 384 RCA to M6i amp): Cambridge Audio 700 Series

e. Interconnect (UD 384 SPDIF to M1 DAC): Cambridge Audio 500 Series Coaxial

f. Comparison: Musical Fidelity M1 CLiC streaming from WD NAS


g. Siltech Classic Anniversary 330L speaker cable
3. For both set ups, I opted to use the U Power to run the UD 384. Hence, I am not reviewing the benefits of using U Power as oppose to plugging the UD 384 to a wall plug.


The Test Tracks

1. Siboh Kitak Nangis – Zee Avi (MP3 320 kbps/48 kHz)

2. My Hero – Foo Fighters (MP3 320 kbps/48 kHz)

3. Hotel California – The Eagles (24 bit/192 kHz FLAC)

4. Enter Sandman – Metallica (24 bit/96 kHz FLAC)

5. Time To Say Goodbye (Live in NY) – Andrea Bocelli (24 bit/48 kHz FLAC)

6. Kingrex supplied tracks with various bits and sampling rates up to 384 kHz

The Office Session

The first time I connected the UD 384, I played Siboh Kitak Nangis by Zee Avi because this was the track that mesmerized me when I reviewed the Naked DIY USB DAC. Straight out of the box, the UD 384 sounded a bit harsh but the sound staging was really evident. Direct A/B comparison (by switching the sound output between UD384 and naked DAC), the UD 384 excel with sound staging. With the track already gave me an emotional experience during the Naked DAC review a few months back, I experienced the same emotional session but with more liveliness and involvement to the music. The vocal was much upfront and the music created a backdrop that made me able to visualize how the song was recorded in the studio. It was indeed a step up to the Naked DAC. But it does cost about 18 times more than the Naked DAC so its not really a fair comparison!

Playing My Hero by the Foo Fighters also gave me a similar experience in sound staging. Its almost made me think that I was listening to a live recording rather than a studio recording. The overall music sounded uplifted with a airy atmosphere. Nevertheless, the thumping of the overlapped drumming by Taylow Hawkins is still heart-pounding and Grohl’s guitar riffs are rocking as ever.

Changing to FLAC files, especially Hotel California and Time to Say Goodbye, the UD384 provided accuracy, boldness and almost balanced presentation between the highs and the lows. The vocals from Andrea was with full emotion and it can be translated into what I call a true satisfying and uplifting atmosphere in my office. However, there was still some harshness in the highs.

The harshness was so evident. The Naked DAC might have lost in the sound staging but still win with overall presentation. Hence, since Kingrex is giving me ample time to review this item, I decided to take up on the suggestion by the manual that this unit needs 200 hrs of running in. So, before I moved on to connect this item to my home hifi set up, I let it run for 200 hours in my office.

The Home Session

I first loaded all the above tracks onto both my Macbook Pro and WD NAS to do a direct A-B comparison between different DACs to process the tracks. Technically, with the above mentioned set up, I am doing comparison between 3 DACs:

1. UD 384 itself

2. MF M1 DAC where the UD384 SPDIF convertor feeds the signal to M1 DAC

3. DAC in the MF CLiC

However, for sake of simplicity, the SQ comparison is only done against the CLiC. The M1 DAC is just to confirm the functionality of the UD 384 ie: can it feed the raw and unprocessed hi res files to the DAC?

So, firstly for this, I have used all the tracks supplied by Kingrex which ranges from 44, 48, 96, 192 and 384 kHz sampling rates and played it on my Macbook Pro, feeding it to the M1 DAC. And I can confirm that the UD384 can feed raw and unprocessed signal to an external DAC. AS you can see from the picture below, the M1 DAC shows the incoming signal sampling rate. However, for I could not test the 384kHz files as the M1 DAC can only receive maximum 192 kHz. Therefore, this unit is very useful for people whom wants to get into CAS but does not have a DAC with a USB input, if one still prefers to use their existing DAC.


Now that the technical part is done, its music time. First up was Zee Avi’s Siboh Kitak Nangis. The UD384 delivers an astonishing clarity and soundstaging after 200 hours of burning in. I just cant believe that this small unit can produce such a big sound. The boldness of the ukulele strum was very evident and just blends in with her voice at a different level compared to using this unit with my office Bose speakers. The natural sound of her voice was represented by a clean and transparent soundstaging. It was indeed a very satisfying experience.

I skipped My Hero and went straight to FLAC with Metallica. Now this is where it became a very different experience. The drums and guitar riffs became very digital sounding in which it became virtual sounding It may be the quality of the file itself but playing the same file through the CLiC, it sounded more natural and bold with drums sounds very convincing and makes me feel involve and just jump on my drums to play along.

Andrea Bocelli’s track was of course the ultimate challenge for me. And the UD384 delivered what I say would be a close match with the CLiC. The UD 384 provided me with the sound staging of a live performance but somehow lacking in the tonal balance. The usual balanced highs and lows that I get from this track is somehow lacking. But nevertheless, it is actually close enough with just a few moments of the track that the UD384 looses out a bit.

The Verdict

The UD384 (and the U Power for that fact) is a next generation, no nonsense upgrade for any CAS enthusiast that can splurge more than my Naked UD100 USB DAC. It is also a unit that can provide a 2 in 1 function plus it can easily match a sub RM2000/GBP400 full deck DAC. And it excels in delivering a soundstaging that can really make you feel involve with the music. I do recommend this for people who are into hi res music because that is where you can rip the full benefit from this unit. Retails at GBP 365/Euro 399, it is a little bit on the pricey side as it can only offer one input which is the USB. And with the limited source of 384 kHz music, one can get a full deck with multiple input for the same price. But as I mentioned, if you are really serious in hi res, you will reap the sonic benefit of this unit.

For the Malaysia market, the nearest point to get a hold of this unit is in Singapore. However, Kingrex welcomes if you would like to contact them directly.

Carol Tseng

Overseas Sales Representative
KingRex Technology Co., LTD
ADD:13F-3, NO. 136
MING-CHUAN W. RD
103 TAIPEI TAIWAN
Tel:
+886-2-8226-9561

Fax:+886-2-8226-2626

website: www.kingrex.com
www.kingrex.net

Monday, 29 October 2012

Saturday, 13 October 2012

Bryston BHA-1 Balanced Headphone Amplifier


Hi all,

I finally received and hooked up this wonderful piece of kit 2 days ago and this is my first 24 hours review.

First of all, why the change from Musical Fidelity M1 HPA headphone amp?


I blame it on the Kuala Lumpur International AV show held in July this year. For this year event, I didnt have anything in mind to purchase. Just attended the show to look around and support a few fellow hifi friends who was show casing their set up. However, it was written in the star that I was to catch a glimpse of this unit on demo from the local supplier. I have several times listened to Bryston set up several times and it has its own merit. But when I saw this headphone amp, I said to myself, I have to try it, especially that it was paired with Grado PS1000 Smile

My my my....it was a jaw dropping experience. As soon as I put on the cans, I was instantly disconnected from the busy surrounding and my mind just focussed on how this unit can deliver such a lively, detailed and natural sound. Such beautiful presentation. But, is it the amp or PS1000 giving me this experience. So, I told myself, I have to try it with my Alessandro Grado MS Pro. Unfortunately, I can only attend 1 day of this 3 days event. So, I guess I have to pay the dealer a visit after the show. And only this week in Oct I have the time to do it Smile

I went to the dealer's shop (AV Designs) with a good hifi buddy of mine from Indonesia. The shop is actually in the same office building as mine and requested a demo on this unit again.

Both James and Low were there and they were very accommodating despite I didnt arrange for an appointment first. I was there for 2 reasons actually. One is to demo this amp again. And the other is to check out their sale on various items. I can see at one corner number of boxes of AV amps, BD players and speakers ready to find a new home at a much discounted price. And I have to admit that I did not leave this shop just with this Bryston amp. The sale on the items was just too good to be passed.

James and Low initially explained a bit on the unit as I had questions on those multiple headphone outputs. Frankly speaking, I never knew there were balanced headphones.

However, just to reconfirm the experience I had in the show, I tested it with the PS1000 cans first. Sure enough, I was not dreaming during the AV show. In fact, it sounded even more natural this time. After discussing with them on some technical queries and commercial of course Smile...I told them that I would need to test the amp with my cans. They fully agree and did not hesitate to invite us to their shop the next day. So, I popped in again the next day with my Alessandro Grado. Part of me hoping that it will not sound as good with my cans to avoid me parting with about RM X380 and ditch my MF M1 HPA. And.... I lost the battle and succumbed to luscious Bryston Smile. It still delivered such a lively and non-exhaustive listening session. And now the unit is hooked up to my system.

Built

This unit is built like a tank, a typical Bryston feature. I opted for the all black unit to match the rest of my black MF set up. The dimension L x W x H is 17 x 11 x 2.425 and weighs 5.3 kg. The volume and balance knobs are sturdily fitted and has the right amount of friction to gradually increase the volume in a smaller scale. Thw power, input and gain switch however are of an old school electrical switch which I dont particularly fond of but the MF M1 HPA uses the same switch too. On the rear, the RCA connection is of gold plated. The power supply connection is IEC and comes with a basic power cord with a UK 3 pin plug. The front fascia is a mix of modern and vintage look and for some might even say it looks a bit industrial. The blue LED power indicator is also soft to the eyes.

Its a Class A amp but does not run really hot. In fact, my Class A/B M6i runs hotter.


Inputs and Outputs

There are 3 inputs available:

1. Single ended RCA

2. 3.5 mm stereo jack

3. XLR Balanced

The unit can drive 3 headphones at one time but with different output connection:

1. 1/4 stereo jack

2. Stereo Balanced output (4 pin XLR)

3. 3 pin Balanced Output

NOTE: there is also high and low gain switch to match your headphones.

I am limited to use the RCA input and 1/4 stereo output.

The Set Up

I hooked up the unit via the tape loop on my MF M6i integrated amp using QED RCA Signature series IC and QED Qonduit power cable.

Sources are:

1. MF CDT via M1 DAC with Siltech XLR cabling throughout

2. MF M1 CLiC with Siltech IC

3. Clearaudio Concept TT via MF M1 ViNL

Gain was set to low.

Headphones are:

1. Alessandro Grado MS Pro

2. B&O P5 (courtesy of my Indonesian buddy)

The Tracks

1. Girl from Ipanema (Stan Getz/Gilberto) - FLAC

2. My Hero (Foo Fighters) - MP3 48kHz 320 kbps

3. Time to Say Goodbye (Andrea Bocelli) - CD

4. Hotel California (The Eagles) - FLAC

Out of the Box Performance

I was so excited with the purchase that I put aside the ‘run in’ principle. Hooked it up and immediately put on the cans and fired up Foo Fighters. Even out of the box, this amp delivered a very powerful yet subtle bass from the drummings on this track. Very detailed presentation in which the 'overlapping' drum beats can be heard on each note. After listening to this track, I went out for dinner and let it run in for 3 hours. In fact, the dealer did mention to me I can actually enjoy the high SQ even fresh out of the box.

The Listening Session

After 4 hours of running in, I started to run my playlist above. First up was Girl from Ipanema. The vocals on this track was somehow elevated and created a personal space to me. ONce the music came, it gave me a different experience compared to playing Foo Fighters. A very relaxing sensation kicked in due to ambience delivered by this unit. However, maybe because its FLAC file, the volume seems a bit lower compared to playing Foo Fighters. I tried switching the gain to high. It did increase the volume level up a notch but I loose the subtlety that I was enjoying. So I wswitched back to low and increase the volume to about 10 o' clock. Previously it was at 9 o' clock. With power output rated at 1 W into 32 ohm, it can easily drive my cans.

Next up was Andrea Bocelli and Sarah Brightman. This track has always been one of my favourite track for reviewing as I measure the performace of the unit tested against Andrea's and Sarah's vocals. Both of their vocals compliment each other to have a balanced tone (high and low pitch). And sure enough the Bryston delivered this flawlessly. This was one part of where the MF M1 HPA having difficulty to deliver the balance for this track.

I then went back to a FLAC file Hotel California. Listening to slow rock and in this live performance by the Eagles is even much more soothing. The live ambience was delivered by the Bryston through my cans that made me feel that I was at the concert and audience are supplied with a personalised headphones. The drums and guitars on this track was so refine and detailed out that you can here every single strumming and plucking the Eagles. This was one track that I repeated thrice just because it sounded too good to be true that I had to confirm and reconfirm the statement I made above. And each time, the Bryston just keep presenting a lively experience.

I went through all the tracks again using the P5 headphones. Unfortunately, the pair didnt give me the same satisfaction. This made me further believe that just like speakers needs to match the amp, headphones are the same. I am not saying the P5 are not good headphones but it just didnt rhyme nicely with the Bryston. A bit on the harsh side.


So there you go. A solid performer this amp is.

Is it worth the price? I strongly believe so.

Will I let go of my MF M1 HPA? Not so soon. It will do some office duties first.

Will I recommend this amp for head-fi-ers? Definitely with a word of caution. Demo it before purchase with your own cans.

But now I am curious how would a balanced headphone sounds like????? Will there be another quest for a new pair of cans after the Alessandro?

Wednesday, 18 July 2012

The 'Naked' UD100 USB DAC


The ‘Naked’ USB DAC


I was in the market recently to purchase a small, portable USB DAC. Mainly to have a quick upgrade to office set up. Set up here is simply a laptop running iTunes/JRiver connected via 3.5 mm x RCA to a pair of powered Bose Companion II speakers. I did wanted to listen to ARCAM rPAC but have yet the chance to visit the distributor. And when our fellow forummer in the DIY section offered openly to anyone whom would want to review his DIY DAC, I solemnly offered my time to him to do a review.

First of all, a big thank you to hifi4sale.net team for having a platform for hifi enthusiasts to share their interest with others. Secondly, thank you to chchyong89 for having the courage to share your DIY design for review.


The Topography

From the picture above, you know why I call this unit a ‘Naked’ USB DAC. Its physically a clean and bare piece of USB DAC. Main components being the USB, the DAC and the 3.5 mm jack.

The DAC used here is an ES9023 Sabre DAC. Its commercially available and it’s basically a 24 bit stereo audio DAC with an integrated 2Vrms op-amp driver. For more information on the ESS website http://www.esstech.com/PDF/ES9023%20PB%20Rev%200.2aPB%20110117.pdf

It is also a synchronous USB unit. A simple definition:

Synchronous USB connections use a one way digital connection for music replay and are considered the worst type of connection for audio purposes

Asynchronous mode is technically most advanced in that it has a feedback loop so that the amount of data in the frame can be controlled.


It is also a plug and play device which works on both Windows and Mac. No software to install. Just plug in and the computer will detect the USB DAC. It will also be the default audio output for your computer. Need to deactivate it if you want to listen to music through computer speakers.


The Listening Session

Three set up were used for the review.

1. My home set up using Window base laptop, running iTunes/jRiver. The USB DAC was then connected to my MF M6i amp using QED 3.5 mm to RCA interconnect. Played through ProAc D18 speakers.

2. My office set up using the same laptop. The USB DAC was connected using the same interconnect connected to a pair of powered Bose Companion 2 speakers. (NOTE: This is actually the main set up that I intend to find a USB DAC for)

3. Using same laptop and the USB DAC is connected directly to my Shure and Sennheiser IEM.

The same tracks were used in all 3 set up:

1. La Mer – Kevin Kline (MP3 48kHz, 320 kbps)

2. La Mer - Charles Trennet (MP3 48kHz, 320 kbps)

3. Siboh Kitak Nangis – Zee Avi (MP3 48kHz, 320 kbps)

4. Enter Sandman – Metallica (FLAC)

5. Time to Say goodbye – Andrea Bocelli (FLAC)

6. Hotel California (LIVE)– The Eagles (FLAC)

Now, don’t be fooled by the miniature size as the result from this DIY unit can be summarized in:

One word – Ingenious

Three words – Size Doesn't Matter

Many many words – One of the best sounding, effective and fuss free upgrade for CAS.

Using Setup 1 at home, there is gap in overall presentation compared to playing my music collection from the NAS via the MF CLiC. Playing La Mer by both artists above via the USB DAC was actually enjoyable. However, it is sort of being amplified as the hiss on the old and original recording by Charles Trenet was more evident then playing it through CLiC. But for more modern recording, there was a slight loss in the details of instruments played on the tracks especially Hotel California. Nothing to fuss about but the Naked DAC presentation loss a little bit of life in the Live ambience of that track. It may also be that for the Naked DAC, I was using the QED interconnect as oppose to Siltech on the CLiC.

When I switch to Enter Sandman, it was hard to spot any difference compared to playing it on CLiC. The Naked DAC gave a similar rock thumping bass drum and the guitar riffs were as metal as it can be.

The most evident however was with Siboh Kitak Nangis. This is a simple and wonderful track by local Miri lass who shot fame in USA by the name of Zee Avi. It is in a local language. It’s a mixture of Norah Jones with a touch of Hawaian music. The Naked DAC injected a new life and experience listening to this track. It gave so much and openness that it made me feel that Zee Avi was performing life in my room.

Now, listening through Shure andSennheiser IEM, in contrary of the designer’s statement in his thread that it is advisable to connect the Naked DAC to a headphone amp, it drove my IEMs nicely. No sound of stress and definitely provided enough clarity and sound level for listeners to enjoy their music without the fuss of a headphone amp.

The last review is meant for the very reason I wanted to get a USB DAC which is to ‘upgrade’ the sound quality in my office. My setup in the office is nothing to shout about. I just connect a pair Bose Companion SII speakers to my laptop.


I know most audiophiles would not even look at a Bose products, but these speakers serve their purpose nicely in my office. But I just wanted to see whether a simple set up (laptop + speakers) can still benefit from a tweak. I don’t particularly like internal laptop tweaks on software nor hardware. I just prefer a plug and play approach. So this Naked DAC was a perfect bill for this purpose. And boy, my jaw literally dropped when I played Siboh Kitak Nangis through this USB DAC. For a simple set up like mine, the USB DAC gave this track a whole new experience to what they call ‘background’ music while you work. In the office I don’t particularly focus on the music as I just need it as a background music while working. But using this USB DAC, work was no longer a focus. I was basically drifted away listening to this track and another track and another track. It created this emotional space for me where I can feel the emotions that the singer was trying to deliver. Similar to the other tracks like La Mer and Time to Say Goodbye. Andrea’s vocals played through the USB DAC and the Bose speakers was so open and spacious that it felt like my whole office was fill with music. Not to mention another colleague of mine stepped in and went ‘Wow….Did you do something to your speakers?’ He too was very impressed that this small USB DAC managed to change the sound quality of simple set up.

The Verdict

Small but powerful, in short. The Naked DAC is definitely a very basic upgrade for CAS but the outcome feels like you have a fully spec’ed DAC box. The only different is its size. Its half the size of the normal thumbdrive.

I cannot say it is value for money as its currently not commercialised.

One recommendation is of course to come up with a proper casing. Then we can call it a Dressed Up USB DAC. The reason for this recommendation is because of its small size, people will tend to make it portable. Hence, it warrants some kind of protection on the exposed DAC chip.

Will the designer sell the unit? Will he mass produce it? Will he be the next Datuk like the father of pendrive Pua Khein Seng ?Smile I let him announce his own plan.

I just wish I had more than 1 week to play around with the DAC.

Tuesday, 17 April 2012

Musical Fidelity M1 PWR Power Amp


This must be the most non conventional and challenging review I have done so far. This is due to the following reasons:

1. First time I am listening to a Class D amp. I didnt know what to expect. Maybe this is a good thing, maybe not.

2. Although the manual says that it matches the M1, M3 and M6 series of MF amps, I was still skeptical due to the different power rating and also different class of amp. My M6i is a Class A amp.

3. I am using Siltech and QED to bi amp the D18s at the moment.

A little bit something about the PWR amps.

Built

The PWR is designed in a shoe box size, to match the rest of the M1 series. It comes in either black or silver finish. Of course I opted for the black since the rest of my kit is black.

It weighs 3.9 KG unboxed. Light for a power amp to me.

The finishing, front and back fascia is as expected to be of good quality. The front fascia comes with soft push Power/Standby switch (with LEd indicators) plus another 2 LED indicators for mono and temperature.

The LED for power/standby however, MF seems to be inconsistent in its design of the differnt components in the M series.. Each different unit have different indicator LED:

1. M1 CDT - Amber for standby, no light for On

2. M1 CLiC - Amber for standby, blue for On

3. M1 HPA - Amber for standby, blue for On

4. M1 ViNL - Amber for standby, no light for On

5. M1 DAC (first edition) - hard push button with blue for On.

6. M6i amp - hard push button with blue for On

7. M1 PWR power amp - Amber for standby, blue for On.

This actually bugs me quite a bit. Odd eh?

On the rear, 2 pairs of left and right speaker terminals, mono/stereo switch, input and loop out RCA connection and also low voltage trigger switch.

It comes with a UK 3 pin power cable which I like.

Basic specs

It is suppose to provide:

1. In stereo mode - 65 WPC into 8 ohm and 130 wpc into 4 ohm

2. In mono mode - 100 WPC into 8 ohm and 200 WPC into 4 ohm

So, why Class D? Feedback from Antony Michaelson - It suppose to operate more efficiently and produces less heat.

As far as I know, Class D amps have been around for sometime. However, though it might be more efficient ie less heat, smaller heat sinks etc, it has not been able to produce high quality sound as most audiophiles long for.

The set up

LTB Enterprise provided me a pair of these PWR power amps eventhough I actually one needed one to bi amp my D18s.

So, I had the chance to have a few set up configurations:

1. Bi amp in mono mode (using Siltech 330L and QED Silver Anniversary XT)

2. Bi amp in stereo mode (using Siltech 330L and QED Silver Anniversary XT)

3. Direct single wiring to the PWR in stereo from the CLiC (using Siltech 330L)

NOTE: for set up 1 and 2 above, the PWR amps are used to run tweeters.

The Session

Review was done using the following tracks:

1.Aaron Neville - Louisiana on CD

2. Andrew Bocelli - Time to Say Goodbye on CD

3. The Eagles - Hotel California on 24/192 hi res via CLiC

4. Eric Clapton - Tears in Heavan on LP

5. Foo Fighters - My Hero on MP3 320 kbps

First in mono mode, I Immediately noticed the way the D18s reacted when bi amped. Mind you, when I bought the D18s, I was bi amping them with my previous MF XA1 and XA50 monoblocks amplification and I really liked it. So, first and foremost, I am re-convinced that I personally can and able to hear differences when a speaker is bi-amped.

However, fresh from the box, these PWR sounded a bit bright on the tweeters. Sad to say, on tracks by Aaron and Andrea, the high end vocals can be a bit pinching to my ears and sounded very sharp. It can really overwhelm the bass of the D18s that were driven by the M6i.

I was a bit concern to then play the hi res Hotel california. But nevertheless, still tried it on and as expected can be a bit shrieking sounding. At this point, I was rather disappointed.

Playing Eric on LP took away that high pitch sound from the tweeters. But then I attribute that to the TT and M1 ViNL.

Playing My Hero (lots of bass pedal), I noticed that the bass is very detailed and controlled. Each kick pedal and toms played on this track can be heard clearly. But, I believe this is an effect of bi amping and not necessarily due to the PWR amps.

Ended the first night with a mixture of thoughts:

1. Bi amping my D18s is good to me

2. Is the PWR power amp a good match to my M6i and D18? NOT Sure.

I then let the unit run in with Hotel California on repeat th whole night.

The next morning, I had a listen for 30 minutes before leaving for work and let the unit run in the whole day. It sounded a bit different but still did not convince me.

After running in for 24 hours, to my despair, still not much different.

Is 100 wpc to run tweeters is an overkill? I ask myself. Maybe. Maybe not.

I then switched to Stereo Mode.

My my my...dont ask me why and how. It completely changed the sound stage. The PWR are still running the tweeters but its no longer sounded high pitched. In fact sweet, luscious and fluid are some of the description I can say about this power amp.

So, does mono vs stereo mode makes a different? To me yes. Is it due to the difference in power supplied by the modes? Not sure. Or is it due to the Class D sound characteristics?

The vocals of Aaron and Andrea sounded very uplifting and there is a small injection of clarity. It just sounded clearer and more detailed than before.

The best improvement from switching to mono mode is on Hotel California and My Hero. The shrieking sound has gone and Hotel California sounded bold and nostalgic. There was a moment that one can feel re-living the yesteryears.

And on My Hero, I can just feel the openness injected into the listening atmosphere. It just compliments further the controlled bass on the D18s from the M6i.

Now, 2 elements have come into place:

1. Effect of bi amping

2. Operating mode of the PWR amps

I have deduced the following:

1. Bi amping my D18s have provided me with a more controlled low ends

2. The different operating modes of the PWR amps have effects on the sound produced (especially if it is used to run tweeters)

So, for the final review, how does this PWR perform on its own? So I took out the bi amping element by connecting the PWR amps in stereo mode to the CLiC via the Variant RCA Connection. NOTE: Volume is now controlled by the CLiC. I then single wired the D18s to the PWR using the Siltech 330L speaker cable.

I can only now use Hotel California and My Hero as music reference.

First I notice is that I needed to crank up the volume (digitally) on the volume to about ¾ of a full bar to get a decent listening volume. However, the characteristics of the sound I heard before was still there. The high pitch was there but since its also running the woofers on my D18s, it did not really overwhelm the low ends of the listening experience. I lost the low ends control that I was enjoying when the D18s were bi amped.

I had to repeatedly tell myself NOT to compare with M6i amp as I started to discredit the PWR amps. It’s not a fair comparison between them. And my quest to bi amp my D18s should not be compared or linked to M1 PWR amp performance.

Putting that aside, I must say the PWR power amps compliments the CLiC quite nicely. Can it run my D18s? Yes it can do that. No struggle at all. Will it be an easy match to any speakers? I would have to say NO. You will have to audition these babies with your own speakers. In general, I feel that this Class D amp matches well with speakers without metal tweeters. If I still have my EPOS M12.2, I would give it a go just to proof to myself this feeling.

Summary

1. The M1 PWR power amp on its own is a great value for price (RRP at RM4300 each) given its switchable mode between stereo and mono. It will fit nicely with streamers or CD players with digital volume control output.

2. Will it match any integrated amps and speakers for bi-amping? Need to demo them on your own although I believe that the Class D is providing this high pitch sound characteristics. So, proper matching of amps and speakers for biamping is vital.

3. Will I purchase them to biamp my D18s with M6i amp? Not in mono mode (2 units of PWR) definitely. In stereo (1 unit), maybe. I will continue listening to it till end of this week in stereo mode, bi amping my D18s.

Thursday, 5 April 2012

Siltech Classic Anniversary 330L Speaker Cable


24 hrs review of Siltech speaker cable.

Its been more than 24 hrs now since I hooked up the Siltech to the D18s. Truth be told, I didnt really have to burn in the speaker cables as I have asked CMY to pre burn it with the ProBurn machine for 48 hrs which is supposed to be equivalent to 200 hrs of running in. Heck, dont ask me about the physics behind the ProBurn. Its a free service I get from CMY so I took it. Previously I have purchased 2 QED interconnects, one pre burn and one brand new. There was actually a different in the sound produced in my set up.

So, let me talk about the plan first. Throughout the past 4 years since I resumed the upgrade path after 8 years of not doing so, I have changed cabling (here referring to IC, power cable and speaker cable) from Cambridge Audio to Ixos to QED and now to Siltech. My introduction to Siltech was not a planned one. Since I got the M6i amp, I have always wanted to hear how XLR sound from my M1 DAC. So at first I was loaned 2 models of VDH XLR, but the sound from them was rubbish. Which I was a bit dissapointed after hearing a lot good saying about using XLR. So then CMY loaned me a pair of Siltech XLR. Boy, I immediately fell in love with the sound. Since then, I wanted to see how and what if I have a complete Siltech signature for my cabling to match the complete MF set up I have.

The second came was the RCA interconnect to connect the CLiC to the amp. Then the CDT transport to the DAC, I needed an XLR digital interconnect as well. Then came in the power cable for the M6i. So, until now my cabling from 3 sources (CDT, CLiC and DAC) and the amp are all by Siltech. The synergy between Siltech and MF kit, to me is very very sweet, warm and lively. But then, I was still using QED as the speaker cable. So the full cycle have not been completed. But I had to wait for some more funds to come before parting money for the most expensive cable I have ever purchased - this Siltech Classic Anniversary 330L speaker cable.

Thats the history. Now the review. To avoid confusion, I have disconnected the new power amps and just let the Siltech run my D18 with a single wire configuration ie the M6i is running both the tweeters and woofers, just like before.

The speaker cable although looks thick, it is actually lighter than I thought it would be. I had a concern that in time, it would bend the speaker terminals due to the weight hanging from the cable when I have plugged into the terminals using banana plugs. The cable is flexible enough to easily handle it and plug into my amp. The banana plugs have a see through plastic covering over the metal plugs itself.

When you purchase this cable, it comes in a box and placed in foam. A certificate with 2 serial numbers is also supplied reflecting each of the cable serial number.

So my setlist for the review consists of:

1. Aaron Neville on CD. Playerd on CDT feeding the M1 DAC to the M6i amp.
2. Andrea Bocelli, Diana Krall and The Eagles on hi res music via CLiC
3. Gypsy Kings on 320 kbps MP3

The first thing I notice was some how the speaker cable have amplified the sound a bit. The usual volume level seems louder than before but it did not loose the subtlety. So first up was Aaron Neviile - Lousiana 1927. Hmmmmmm.... The vocals came out to be full of soundstaging. Its hard explain its as if you are watching a 3D movie but for audio. There were layers behind his voice that I could not experience before.

The best part was that it enhance the low end notes but without providing the excess boom. I was kind of worried the the bass will be to overwhelming for my room. But NO. Play Hotel California and the drums on that tracks just comes out sounding original and even more controlled than before. The wire brush on the snare on one of Diana's track sounded airy and spreaded across the room. I can actually visualize the drummer's hand spinning the wire brush around the snare. Again, its like 3D for audio.

Then comes out Andrea for the ultimate vocal test. Again, it feels like his voice was uplifted and airy. But its all balanced out by the low end produced by the woofers. No pinching experience from the enhanced tweeter sound. Being hi res source, I again was worried that it give too much enhancement on the tweeters but the cable just manage to adapt itself to maintain the warm sound I like but at the same enhance or elevate the music atmosphere up a notch.

The final test was to see how it copes with a fast paced and multi instrument music. the Gypsy Kings Bamboleo track was definitely giving the cable a run for what its worth. The dynamics produced by D18s was something that I have not heard off before. so I had to attribute these dynamics to the Siltech speaker cable.

Now, is there such thing as a speaker cable that chokes back the music? At one point when playing Diana Krall I've Got You Under My Skin, I could hear some sort of struggle for the tweeters to reproduce a few of the piano notes. Was not satisfied with tha, I loaded the normal CD version of this track instead of using the hi res file. Voila, I didnt hear that strain on the CD. It might be a bad upsampling of the track. Damn HD Tracks.

Now, this speaker cable as not on loan for testing. I was so confident of a Siltech product that this time around, I paid and purchased the item first rather than the usual 'Can I Test first kah?' even CMY was surprised as usually I will ask for a loan first before committing.

To summarize, I feel Siltech products provide a signature of dynamics, enhancement and uplifting which somehow creates a 3 dimensional experience. If not for all but at least for my MF set up.

Now.....thats the end of my cabling venture for a while. Maybe in another 8 years time, you will see this speaker cable on the For Sale thread. But for now, its a keeper and the last piece of jigsaw to my cabling quest.

Next....MF M1 PWR amp review.

Saturday, 5 November 2011

CD-Less Set Up for Dummies

1st Write Up: 5th Nov 2011


I have been contemplating to write about this for quite sometime now. Finally today had the courage to start the write up. It took me about an hour just to come up with the thread title.

The reason I had the courage today is because I have been receiving quite a few PMs asking me about the basic CAS setup. So I hope to share what my understanding is on this matter.

I chose the title CD-Less instead of CAS because it covers the very essence of the different set up using computer which is putting away the usage of CDs.

DISCLAIMER: This is based on MY understanding and experience in setting up such system. Its neither right nor wrong.

BASIC Definition

CAS (Computer Audio System) - Music files (eg WAV, MP3, FLAC) played by a music software (eg iTunes, Winamp) on a PC/laptop. PC/laptop here refers to the physical unit of a computer, running on Windows or Mac or Linux, equipped with other softwares like INternet Explorer, Micorsoft Word etc and also serve other purpose then playing music. To play music, this unit must be physically ON.

DAS (Digital Audio System) - Music files (eg WAV, FLAC, MP3) played by a media player. Media player refers to a physical unit that its ultimate purpose is just to play music (eg MF CLiC, Bryston BDP1, SB Touch, Olive, Naim Uniti, iPod, iPad). The media player may also still be running on an operating system such as Linux, Mac etc. The music files can be stored on a NAS (Network Access Storage), thumbdrive, external hard disk etc. To play the music, NO PC/laptop is required.

What are the BASIC components?

Given that one would already have an amplifier and a pair of speakers, they can embark into either of these options.

CAS:

1. PC/laptop/Mac equipped with sound card

2. Softwares eg iTunes, Winamp

3. Music files stored on the PC/laptop or external hard disc

DAS

1. Storage device eg external hard disk, NAS

2. Music files stored on the storage device

3. Media player eg MF CLiC, Bryston BDP1, SB Touch etc

BASIC Connection

CAS: 2 options available

1. Using an interconnect with 3.5 mm jack on one end and a pair of RCA stereo on the other hand, connect the 3.5 mm jack to the headphone output on the laptop and the RCA onto the amplifier

2. If your amp has a USB input, use a A-B USB cable. Connect the A side to the laptop and B side into the amp.

NOTE: The PC/laptop needs to be ON in order for you to play music.

DAS: 3 options available, depending on the input available on your chosen media player and storage method. Using MF CLiC as an example here.

1. Wired or wireless network. Connect your NAS using etehrnet cable into your home wifi router. For wired option, use another ethernet cable from your wifi router into the media player.For wireless, follow the instruction of the media player to connect to the wifi router. From the media player, use a pair of RCA interconnect and connect to your amp.

2. Direct USB connection from extenral hard disk/thumb drive. Use standrd USB cable. From the media player, use a pair of RCA interconnect and connect to your amp.

3. Direct USB connection to iPod/iPad. Use the standard Apple cable supplied with your iPod/iPad. From the media player, use a pair of RCA interconnect and connect to your amp.

Add ons

CAS:

1. Dedicated DAC inbetween the PC/laptop and the amp.

- you can use an optical digital cable to connect from your headphone output into your chosen DAC optical input. This is usually limit the data transmission to 48 kHz. At least I know it works for Mac.

-if your chosen DAC has an asynchronous USB input, use an A/B USB cable to connect your PC/laptop to the DAC.

2. Tube buffer inbetween the PC/laptop and the amp

- a unit like MF 10D tube buffer will usually add some warmth to your system. Using an interconnect with 3.5 mm jack on one end and a pair of RCA stereo on the other hand, connect the 3.5 mm jack to the headphone output on the laptop and the RCA onto the tube buffer.

For all options above, use a pair of RCA interconnect to connect the DAC or tube buffer to your amp.

Where Do You Get the Music Files?

1. Purchase the files directly over the internet and store it onto your chose CAS/DAS storage device

2. Rip your existing CDs into your chosen music file format. Eg: iTunes

3. The best way - pinjam from your kawan Smile

So, there you go, the very basic of CD-less system. I started of using CAS but can no longer tolerate having my laptop crashing every now and then so I have moved to DAS with the following compnents:

1. 2 TB Western Digital NAS connected to Unifi Wifi Router

2. MF CliC connected to wifi router using ethernet cable and via homeplugs.

----------------------------------------------------------------------------------------

2nd Write Up: 7th Nov 2011

Streaming Convenience - More Add Ons

So, you have want music in every corner of your house? It used to be very expensive to do this as you have to run speaker wires through walls or over the ceiling to the next room. Plus your amp most probably can only run 2 pair of speakers and you have 10 rooms to fill it up with music.

Lo and behold. No more headaches wallet complaining to do this.

Currently, you have 2 options to stream music all over your house. The following is from the cheapest to the more upmarket ones

1. Wireless
1.1 Wireless via Wifi
Airport Express:

- Works with both Mac and Windows.
- Need to have your laptop/PC ON, so this is under CAS
- Need iTunes running for this to work
- If you have an iPad/iPod Touch/iPhone, you can select the songs you want to play on your laptop/PC from either one of these gadgets.
- The Airport Express (AE) basically connects wirelessly to your existing wifi router where music from your PC will be streamed to the wifi router then to the Airport Express.
- You plug in this AE to a electrical plug outlet in the room you want it to stream songs to, connect and active/powered speakers to this AE, select a song from your iTunes, and voila, you will be listening to music in another room as well. (OK, there is some basic setting you have to do on your PC for the first time usage)
- You can have as many as 16 (if I am not mistaken) of these AE in your house where each of them can be stream the SAME SONG at the same time.
- Each AE can be named (eg lounge AE, kitchen AE) and the volume can be individually controlled from iTunes or your iPad/iPod Touch/iPhone
- Disadvantage - you must have a good, stable and powerful wifi router. Weak wifi signal will cause signal to drop and you will not enjoy the music.
- Main advantage - cheapest available wireless option, can act as wifi router on its own as well and you can also connect to a printer to create a network printer for multiple PC/laptop wireless printing.
-Now, you can also stream directly from your iPad, iPod Touch and iPhone to these AE. BUt how it works is still the same as above: iphone -> home wifi router -> AE
- Want to make it sound better? These AE allow digital optical connection to a DAC.
- RRP: you can find them at RM330 brand new from online Apple store

Second choice would be Squeezebox Touch: However I do not have any experience dealing with this.

Thirdly which is the most expensive is the Sonos wireless system.

Similar concept as AE but does not depend on your home wifi router. It has its own dedicated wifi router, hence does not depend on your home wifi router signal. Less issue on signal dropping.

Depending on your choice of Sonos, some of the units comes with built in amp and speakers. So, thats all you need.

1.2 Wireless via Bluetooth (BT)

As the quality of music streamed via WiFi is as good as the performance of your router, some people wants a more reliable network for streaming. Bluetooth is another technology that has been adapted in music streaming.

The cheapest and simplest unit is the QED uPlay, retailing at about RM280 if I recall correctly. Its plug and play. Its also known as 'The Puck' as it is shaped as an ice hockey puck. It comes with 2 options to connect to your amplifier, either with stereo RCA or 3.5mm jack. It uses Apt-X technology for the BT signal.

The second unit is a more gungho unit by BRIK Audio. I have done a review on this under the Equipment Discussion forum. The unit is called BT Stage. All you need to do is to connect a pair of stereo interconnect from this unit to the amp, and you are done.

For both units, pairing it with any of your BT enabled media player (iPod, iPad, nokia phones, BB phones etc) is simple. Just switch on your BT on your device, search for BT Audio, key in 0000 as the code and voila, you are connected.

2. Wired

Music can also be streamed via ethernet cable, but again, do you want to run a long ethernet cable to other rooms? Very messy.

So, once you have chosen your streamer device eg Sonos, MF CLiC (or even if you have an Oppo BD95 EU blu ray player), you can purchase a pair of homeplug devices to avoid messy ethernet cabling. Make sure your streamer has an ethernet input.

Homeplugs basically use your existing electrical cabling in your house, to send internet data from one point to another. So, basically it is wired.

You take one unit of homeplug. Plug it near your wifi router. Connect a short ethernet cable from you wifi router into this homeplug. Then, take the second homeplug and plug it where you want to stream music to. Connect another short ethernet cable from this second home plug into your streamer.

Thats it. Both of the homeplug units will search for each other via the electrical cable in your home and send data to each other.

NOTE: Both of the plug outlets that you use, must be in the same phase of your home electrical cabling. No issue for homes with single phase wiring. But for 3 phase wiring, have to make sure the plug outlets are in the same phase.


3rd Write Up: 9th Nov 2011


My Set Up

1. First CAS set up (now retired Smile )

Hardware: ASUS - Windows based laptop
Software: iTunes, Foobar

Streamer: Airport Express in Kitchen, Lounge and HiFi Room

DAC: Musical Fidelity X-DAC connected to AE in HiFi Room

2. Second CAS Set Up (now retired Smile )

Hardware: Mac PC

Software: iTunes

Streamer: Airport Express in Kitchen, Lounge and HiFi Room

DAC: ARCAM rDAC connected to Mac via A-USB

3. Now moved to DAS

Hardware: Western Digital 2 TB NAS (also used to stream movies via Oppo BD player)

Software: NIL

Streamer and DAC: Musical Fidelity CLiC

4th Write Up: 15th November 2011


Quoted from The Absolute Sound magazine (2012 High End Audio Buyer's Guide)

Computer Audio is simply put as the playback of digital music files from a computer or hard drive based storage device.

Thursday, 3 November 2011

Musical Fidelity M1 ViNL


Now folks, been running the COncept TT through the ViNL for about 8 hours now over 2 days. And my first minute impression of the unit just got better and better.

People might feel that I went over the top with the remark of the missing link in my TT venture but this piece of kit really did gave the BIGGEST improvement compared to when I upgraded my CDP, Amp and speakers. Value for money it is indeed. Especially for someone whom have been facing lows and highs of using TT for the past few months.

Built

As the thread title suggest, it came in the increasingly popular shoebox black ash casing, similar to the other M1 series of CLiC, CDT, DAC and HPA. Relatively lightweight at 3.5 KG unboxed. Nicely finished with the normal 3 pin power cord, another feature that is always good in my book. I dont really like equipments that comes with those 9 Volts plug.

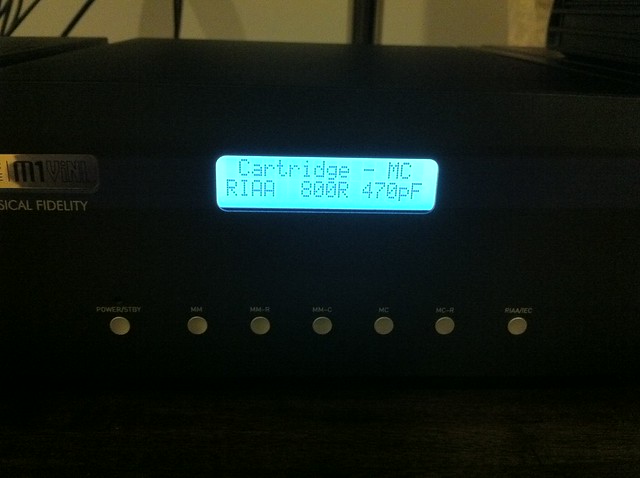
The display window is the similar light blue screen similar to CDT. It is easily legible from about 6 ft away.

The soft buttons for Power/Standby and the list of options between MC and MM and the response curve are very responsive and well laid across the front fascia.

Input/Output

1. 1 pair of RCA MM input

2. 1 pair of RCA MC input

3. 1 pair of RCA output

4. 1 pair of balanced XLR output

5. 1 trigger input

6. 1 trigger output

7. Earth connection

I particularly like the feature of having the XLR output but unfortunately I will not be able to use it as the only XLR input on my M6i amp is used by my M1 DAC. Bummer.

Features

This is the best. Well, at least for me as these features really gave me the biggest improvement. More importantly, I found that music signature that I long for from the TT. I do believe some of this impression I get is due to the fact that my ears are accustomed to MF signature.

1. MC Loading resistor selection

There are 10 options available to choose - 10,18, 25, 50, 100, 200, 400, 800, 1600 or 470000 R (ohms).

To be continued....breakfast time...hehehehe...sign off 7:23 am.

Sign in 3:15 pm: Whooooppsss breakfast turn to sending my boy to school turn to errands hahahaha.

Now back to hifi heavan.

With minimal knowledge, what I notice is that the higher the resistor value, the 'louder' the TT sounds. At a 10 o' clock volume on the amp, the TT sounds louder at 47k R and softer at 10R. After few hours of listening, it does not only do that but what it does (to my ears), smoothens some harshness on the high notes at 47K. Tried some 'noisy' LPs, and the harshness on some of them are reduced.

I find myself to like 47K R best for older LPs and 1600 R on new LPs.

For MC, capacitor is fixed at 470 pF.

If you know the resistor specs of your cartridge, its even easier as it is recommended to match the settingns to the specs.

-------------------------------------------------------------------------------

2. MM loading resistor selection

Two options available at 47K and 68K R

3. MM loading capacitor

Eight options available - 50, 100, 150, 200, 250, 300, 350 and 400 picoFarad (pF)

For items 2 and 3, I have no chance to test it.

-------------------------------------------------------------------------------

4. RIAA and IEC

The choice to roll off the output at very low frequencies from the normal RIAA frequency response can be activated by choosing IEC.

On one of my old LPs that is very noisy, choosing IEC sounds much better as it reduces surface noise.

Listening Session

First went in was Diana Krall - Quiet Nights. First track was Walk on By. It sounded really different from my NAD phonostage. One thing for sure, the warm MF signature has been injected into the Concept TT. Very nice indeed. It gave me this chill to the spine. Diana's vocal extremely blends into the entire song.

Then went in my famous Black Dog Bone LP. It sounded less mechanical using ViNL. It took away some part of the 70's sound and gave it more life. Not sure whether thats what you want from your 70's LPs but it did took away a lot of background noise which then gives me a good clean sound with a touch of warmth.

OK, now those LPs have always been good to me eversince I got into TT. Now the greates challenge is those so called 45 RPM audiphiles LPs, namely Metallica.

So went on Ride the Lightning LP. First track on was From Whom the Bell Tolls.

Applying 47K R and IEC, thats when Metallica sounded better than the usual sound I hear using NAD. More liveliness to the overall dull and flat sound previously heard via NAD. At 10 R and RIAA, its not worth listening to.

Next track was Fade to Black. The guitar intro was superb on 47K R and IEC. The drums still sounded a bit flat but there was an improvement.

I am still not convinced with this audiphile grade claim on 45 RPM. But I am glad this ViNL injected some life into my 45 RPM LPs.

Is it that good?

To me, YES. Why? Maybe because I am a novice in LP. Maybe because my forehead has an MF stamp on it. But my ears surely like what they are hearing.

Now, how much did I coughed up for this unit? RM 0.....hehehehe. Not yet paid as I am demo-ing it first. But from the 2 days affair, I will be poorer by RM 3900 soon.

I heard soon also this unit will be reviewed by our resident newspaper columnist hehehe. So for more technical evaluation, watch out for it.

Unfortunately LTB Enterprise does not have an LP set up to test in his shop. So for those who are interested, is best to wait for official review in the papers.


Thursday, 27 October 2011

Confined Space: Musical Fidelity M1 HPA


Confined space in general has always been considered as a hazardous area, well at least in the oil and gas industry. There are also people who cannot stand being in a small area or room for a long time due to claustrophobic.

In hifi world,the terms of openness, airy, liveliness etc are widely use to describe how the music flow right from the source to the amp and to the speakers and provide the listener with all these experiences that can be described in the terms above.

Big speakers are usually related to big rooms in order for them to sing. Heck, I got a bashing for buying D18s in putting them in a small room. But hey, me ears are telling me that those speakers are filling up my room with music nicely.

Now, if we often describe the experience we feel with our system to be fulfilling in a given room size, how then there is a big following of so called head-fi??? Whom majority of them have confined their listening pleasure to a set of cans around their ears? Are they missing something that hifi and audiophiles quest for? Cost is no longer a strong reason for people to say that head-fi is cheaper than hi-fi hobby. I have listens to a pair of cans that cost RM25K, nearly double the price of my D18s. And I saw one guy walk away with purchasing it a few months back. !!!!

Enough of rambling. This is a story of how my recently conversion into the dark side was even further darkened by the introduction of Musical Fidelity M1 HPA. Coincidently HPA stands for Head Phone Amp. The idea of using headphones for listening pleasure came to me about 15 years ago but I was not introduced to it properly. I didnt enjoy the confined listening area around my ears. Never got into it again until I got my second child in 2010. Had to start thinking of option to enjoy music without waking up the kid.

Long story short, I went from Musical Fidelity X-Can V2 to X-Can V3 and to M1 HPA within less than 2 years period. And this HPA have further strengthen my believe towards the wonderful dark side of LP.

I have gone through most of the LPs I have now on both D18s speakers driven by MF M6i amp and also a pair of Alessandro Grado MS Pro cans driven by M1 HPA. Both methods gave me a different perspective of the LPs I play.

Here I give you a fe examples.

1. Brand new Diana Krall Quiet Nights - Via the D18s, her vocals were very transparent, fulfilling with a slight touch of low end especially on the Ipanema track. The details of each instrument was defined and well balanced. Of course the LP being brand new, didnt hear any crack and pops. Switch to the MS Pro cans, I didnt loose any of these characteristics. But wait, I gained something else, a sense of space. I feel like I was in the studio where Diana Krall was recording the album. Listening through the cans gave me this enclosed and more control over the reproduction of the album. I though my mind was playing tricks on me. I did the same comparision with Andrea Bocelli's album. It confirms further that confined is not always hazardous Smile

2. Now, vocal-based artists and albums are sometimes easier to comment on their good recording. But how about some heavy metal and rock stuff. Out went Diana and came in Guns & Roses. Still one of my beloved LPs thus fars, Spaghetti Indicent. PLaying Since I dont Have You on D18s just gives me the rocking sensation. The growling guitar of Slash and and the subtle drumming on this track can be considered to me as one of the fine moments of Guns N Roses in their career.The atmospehere it creates in my room was very lively and full of energy. And this was at my normal moderate listening level of 10 o clock on the knob.

Switch to HPA, hhhhhmmmmmm....bass was heaviers and defined, Axl's vocal strength was further refinedwith such balance with the guitar. Its even easier to hear the separation between vocals and instruments used on this track. Again, it gave me this feeling of me being in the recording studio with them.

3. Last example, went in Black Dog Bone. This was an LP from the 70s that is worth every cent (out of Rm40 I paid for it hehehe). I really love the quality (and the simplicity of the recording) from that era. It was clear that the band had fun recording the album. I can really feel that their songs blaring through my D18s have managed to give me this sensation of being in the 70s although I was only born in late 70s.

Switch to HPA and it became a bit too harsh mainly because the cracks and pops were much more evident and the ones that I could tolerate via the D18s, it were too loud for cans.

So, for TT lovers, try out headphones for a more defined experiences with LPs. However, ensure that you are exposed to head-fi properly. Dont make the same mistake I made 15 years ago. Mistake meaning I was listening to a RM15 headphone bought from TTDI pasar malam hehehehe. Get a dedicated headphone amp and a good pair of cans.

Finally, a little bit on M1 HPA.

Its a pure class A headphone amp with low impedance to drive cans with low distortion. I have tested this HPA with 5 different headphones:

1. Alessandro Grado MS Pro

2. Bose Over the Ear

3. Bose QC 15

4. Monster Dr. Dre Beat Studio

5. Sennheiaser PX100

All of them were driven nicely with no sound of stress nor distortion. For moderate listening, 9 o' clock on the knob is sufficient.

Built

The HPA comes in a similar black ash metal shoe box casing like MF's other M1 kit. Sturdily and stylishly builts. Very sleek look. The PSU is built in and power via a good 3 pin plug. I however changed the power cable to QED Conduit just because I had a spare unit.

Inputs/Outputs

It comes with the following:

1. 1 x Line input

2. 1 x USB input (like MF other M1 kit, limited to 48 KhZ)

3. 1 x pre out

4. 1 x line out

5. 2 x headphone sockets

There you go. Another M1 kit that made it nicely onto my rack.

Tuesday, 27 September 2011

Clearaudio Concept Turntable

Write up inspiration: Black Dog Bone -Si Gadis Ayu album - original pressing from 1978 EMI.

It has been 10 days since I bought the TT but this is only the 4th time I get to listen to it due to my work and family commitments. But nevertheless, the experience I am having now while writing this up is out of this world.

So, lets recap the magical day. It must have been the longest 2 days wait for this unit. For everyone's information, I usually will not buy a piece of equipment if a retailer does not have the unit in stock at the point of purchase. Especially if I am to part with a few thousand RM. But nevertheless, past experience with CMY loaning me speakers, cables, etc which cost more than this TT, I only have confidence in them.

But the wait to listen to the sweetness of TT in my own room was still painfull !!!!

So on Monday 19th Sep, I called the retailer late morning to inform him that if the unit is ready earlier than 8 pm, just give me a call as I was ready to leave work early that day hehehe.

But at the end, the unit was only ready by 6 pm due to the heavy rain early in the morning. The retailer waited for the rain to subside before tarnsferring the unit from DU to Sunway Giza.

Two thumbs up for CMY for being punctual. 8 pm - the retailer arrived at my house.

2 boxes came out of his trunk - one with the TT and one with the acryllic dust cover.

Another 2 thumbs up to the retailer for calling me before hand to suggest the Elixir cartridge cleaner. So, there you go. I went out to get the full basic requiement for TT heheheh.

Inventory check:
1. 1 x ClearAudio Concept TT = comes with the Allan key to replace the cartridge, 'level' gauge and various plugs
2. 1 x ClearAudio Dust Cover
3. 1 x Elixir cartridge cleaner
4. 1 x ClearAudio MC cartridge - yes I swapped the MM with an MC
5. 1 x ClearAudio Clamp (CMY brought 2 models - I opted for the heavier Quadro clamp massive SS after comparing the 2)
6. 1 x LP brush
7. 1 x anti static gun

NOTE: Please excuse some of the terms I use if its not the norm for TT lovers.

Out came the TT, belt, sub platter (???) and main platter (???). I can see that the retailer knows exactly what he is doing. Setting up the TT, he also explained to me the parts although as you can see,
I could not really pay attention as I was eager to listen to the LPs I have bought earlier.

Next came out the plug which I opted for the 3 pin plug. But before pluggin it into my PF50 Pure AV, the RCA was first connected to my NAD PP-3 phone pre amp. Yes, this unit somehow does not match the rest of my set up, hence it is actually now hiding behind one of the kit hehehehe.

Then the power kicked in and the retailer switched on the TT to 33 RPM. But then, he further built my anticipation by explaining on how to take care of LPs ...aaaarrrghhhh hehehehe. But thanks for the information.From how to take out the LPs for its sleeve and how to store them. I thought handling CD was delicate. Boy I was wrong.

Then came in the anti static gun. My 1.5 years old daughter was with us throughout the set up. She looked at the gun and wanted to play with it.

First went onto the TT was the brand new Metallica Ride The Lightning album on 45 RPM. Just applied the cleaning brush briefly as this is a brand new LP. So, how did it sound????

Lets recap some info of the TT first:

Built

This unit is actually quite heavy for a 'beginner's TT compared to Rega and ProJect. I particularly like the spike/stud underneath the unit. It made it really stable.
The tone arm however is very light to my shaky hands. I basically did not dare to take off the cartridge protector, let alone sliding the tone arm and dropping it onto the LP. I let the retailer do it for me.
My hands were too shaky hehehehe.

Power Supply

I was actually expecting a sturdier built for this price of TT but nevertheless, it also did not look like an RM10 adaptor. I just hope it will last long.

RCA

The RCA interconnect is built in together with the tone arm, so no way to change interconnects unless you change the tone arm.

Now back to sound....

My set up for the first experience is basicallY:

1. TT to NAD PP3 phone stage using the built in RCA
2. NAD PP3 to Musical Fidelity M6i amp using Cambridge Audio interconnects
3. M6i to ProAc D18 sepakers using QED Silver XT Signature cable

First song to kick in was Fade To Black. The first thing I notice is that I have to crank up the volume knob to at least 10 o'clock to get a decent sound.
The retailer mentioned that this is normal for TT. I grant that anything analogue seems to have a lower volume output. Same like my cassette deck.

But then, the guitar plucking at the beginning of the song did not give me that sensational feeling I was looking for. I had to put on the CD version of the track just to reconfirm this feeling.
True enough, at that point, I felt that CD gave me more sensational feeling. Getting a bit worried here.

So what went wrong? Where is that beautiful sweetness LP sound that I heard in CMY..both Sunway Giza and One Utama??

And then.....the retailer put on the first clamp (notice that above, I did not use any clamp). The first one is lighter (cant recall the model). But I can immediately hear the difference in the sound.

I guess the clamp does provide better levelness onto the LP spinning. Repeated Fade to Balck and this time the TT carried a heavier sound signature with the guitar plucks seems to be alive.

Sat through the whole song wit a smile on my face. And yes, you guess right. I then requested for the heavier Quadro clamp to be put on.

And things just got better. I basically forgot that the CD version is still playing on Repeat 1. Hehehehe.

With the Quadro, the whole song sounded more open, without loosing the grip on low ends and there was no sign of harshness on the high ends.

Ok, that is so called the audiophile grade of LP.

Lets go to the basic of 33 RPM LP.

Off with the Metallica and came in Guns N Roses Spaghetti Incident, courtesy of Mugenfoo generous offer to sell it to me. Its a Venezuelan pressing...rare indeed.

I cant stop smiling listening to the growling guitar of Slash on Since I Dont Have You before the drums kicked in. The sound of every tom and snare of the drums are echoed precisely to my ears liking.

Now, my ProAc can really sing with this TT. For this, I didnt bother to compare to the CD version as I know that the CD version will loose the battle.

Hmmmm... all good for the new LPs. How about the old one?

I bought the Black Dog Bone LP in Amcorp mall for RM41. Physically there was only one slight deep scratch, luckily only on the last track. I was actually worried that it can damage the cartridge but the retailer said that it should be ok.

This is when I was hit with the biggest confusion in my 15 over years hifi venture. This LP sounded so much alive compared to the new LPs I bought.

Literally, it gave me this feelings of being in the 70s and all I wanted was to put on a bell bottom jeans Smile. Sound exagerating right? But thats how I felt.

The raw but genuine guitar chords was simply amazing. And the sound of the drums which I think was set up hollow in the recording, gave me this feeling that the band really enjoyed making the album.

It was completely set up by 9 pm and I was another CMY's happy customer.

I only continued playing the TT at midnight after the kids are asleep. till 3 am hahahaha. And I was late for work the next day.

But then, the TT went on sleep mode from Tuesday night till tonight Monday night.

Back on Black Dog Bone and thats when I deciede to write this review.

But, its a different experience tonight.

What is the different????

I rested the ProAc D18....and listen to the TT using my newly acquired Musical Fidelity M1 HPA headphone amp, feeding music into my Grado Alessandro MS1 Pro.

But thats another review on its own.

NOTE: For all you TT lovers out there, try listening to your beloved TT via headphones. Its another whole new experience.


CONCLUSION


1. Easy to set up with plug and play approach

2. Suitable for beginners who would want a mid entry level TT

3. Well built, you will realise where your money is spent on - build and sound quality

4. Having a decent clamp can do wonders to the sound

Sunday, 4 September 2011

Yamaha RXV-2067 and Oppo BDP 95 EU


This review is long overdue due to some technical glitches I was having after I purchase the Yamaha RXV 2067 during the KLIAV 2011.

Before that, I would like to recap some of my ventures into the digital video medium. Putting aside the VCD era in 1994 to 1997, I first ventured into DVD when it was first launched in UK in 1998, i purchased the sony first dvd player that cost me 500 pounds. At that time, the discs were so scarced and cost up to 30 pounds each. Life was simple then because there was only one superior audio format which was Dolby Digital. At that time, I owned a Sherwood 925 AV RECEIVER which was a Dolby Digital ready meaning it can accept the 5.1 audio via 6 RCA cable and let the player decode the sound. I was a happy camper until....

DTS and multi region players came along in year 2000. I opted for the famous Wharfedale DVD player for 99 pounds, purchased from Tesco. At that time, DTS only came in Region 1 DVDs so I started purchasing DVDs online from USA. Aaaaahhh but the Wharfedaleplayer does not have onboard decoding, so thats when I purchased the Yamaha RXVa795RDS AV amp. It was among the first AV amps that could decode DTS. Life was good again until....

Blu Ray came along. While the format war was hot between HD DVD and BD, I purchased the Sony BDP S1E flagship player from Desa HT in 2008 together with a Samsung 42" Full HD LCD TV. Picture was so much better than DVD. I like and was a happy camper eventhough at that time, my Yamaha could only decode 'normal' DD and DTS. I put a hold on upgrading my home cinema to make way for 2 channel audio upgrades. I was a happy camper until....

2011 KLIAV show. After a few years focussing on 2 channel audio, this year I leaped into the so called DTS MA and DD TrueHD. I purchased the Yamaha RXV 2067 after comparing it with Onkyo and Marantz. I wasnt in the mood to set up this beast as it weighs a bit compared to my 795 unit, so I had Desa guys to come and set it up the very same Saturday night.

All set up by 830 pm after 45 minutes of moving around my set up. Desa HT guys are very pleasant people to deal with. And clean as they make sure no mess was left behind. All joy from now right?

Nooooo.... My so called Sony flagship BD player from 2008 cannot send DTS MA signal via HDMI. Aaarrrgghhh...so still not manage to experience DTS MA.

The Desa guys set up my system manually by specifying the speaker size, distance and volume. I can immediately hear the refined sound from the new amp compared to my 795. Decent movie volume starts at -30 dB. However, my faithful Wharfedale SW15 subwoofer, sounds a bit out of the league at the moment.

A few days after that, I started to play around with the YPAO mic. Using the suggested tripod method, I let the system dictates the set up. I expected the sound to be unbalanced because the living room I have. There is a big void over the stairs on the left side of the room. Aaaaahhhh but I was wrong. Reading through the analysis results, it took into account that void area and compensated the 'volume loss' on the left speaker. However, I notice my right rear speaker was a tad softer thatn my left. I checked all cables (I was using a Gale speaker cable from 1998), swapped the rear speakers, maximise the right rear speaker volume and still, very low volume. So I suspected something faulty with that section of amplifier.

Called up Desa and they came by the next evening. Did the same checks I did and yield the same result. Low volume on right rear speaker. And then he suggested something. Change speaker cable. And voila, everything back to normal. Balanced volume between all speakers. Callibrated the room again using YPAO and now its even more refined.

But, I still have not experienced DTS MA. Sad. Cannot sleep every night. So started to do research for a player that is future proof for at least 3 to 4 years more. Ended up to choose between a Marantz Universal player 7006 and Oppo BDP 95EU. I auditioned the Marantz at a friend's place and the Oppo at CMY.

I ended up purchasing the Oppo as I got a good price and also a one-to-one exchange for the first year if anything goes wrong.

And finally after 3 weeks of purchasing the Yamaha 2067, i experienced DTS MA for the first time in my living room. And just a few days ago, experienced 7.1 DTS MA on POTC Strange Tides. Superb.

One feature I like of the YAMAHA is that I can bypass the unit (no need to turn it on) if I just want to have the sound coming out of the TV when watching ASTRO B.YOND. I LIKE.

One thing I have not fully set up is the subwoofer. I am not getting the same 'blend in' like I used to have from my previous amp. I did connect both left and right channel subwoofer out from the new amp compared to previous amp where it only bad one sub out. Maybe thats why.

Or maybe I need a new sub?

As for the Oppo, Its a fast loading machine with ability to stream movies from my NAS as well. Previously I was using my Samsung LED TV to do that but I dont get the audio to feed through my AV AMP.

Now, I can heheheh.

Overall, I feel this is a good combo between Yamaha and Oppo. Picture is crystal clear, sound quality is really engaging especially after the cable change and also YPAO callibration.

Need to work on the sub though.

Hopefully this time I can stay a happy camper for a longer time.

Part Deux

A little bit more on Oppo.

So yesterday I watched 2 movies. Los Angeles Battlefield and an old movie Twister.

The LA Battlefield came with MovieIQ and BD Live features. Both needed internet connection which the Oppo wifi dongle connected to my Unifi router with minimum fuss. My router is on the lower floor.

First the BDLive. Its mainly showing what other movies available based on various genres. Good trailers shown. Once the trailer is fully loaded, the streaming is flawless.

For the MovieIQ, its basically provides you with the following:

1. Facts of the movie, score, casts etc
2. Explanation about the scenes

Now, the number 2 item is very unique. The player will first connect the BD to the MovieIQ database over the net. Then it will give you a code where you can then use your iPhone, iPad or other Smartphone to be connected and synced to the BD. You first visit the website and key in the code provided and the same MovieIQ features on the TV is now shown on your phone. You can then go back to a full screen movie on the TV and use your phone to access MovieIQ. Neat.

Now for the movie experience.

Both movies were in 5.1 DTS MA. The battle scene in LA was really engaging where planes, bullets were flying around my living room. A clear experience can be felt when an airplane was flying from my rear right speaker to the lft front speaker. The best way to experience this is to close your eyes and just listen to the effects churnedout from the Oppo and Yamaha.

Vocals were very clear on the centre channel although once in a while, it gets drowned in the battle commotion noise.

Twister on the other provided me a world wind experience. I can feel when the twister was approaching from far ahead and towards the screen. Really uplifting compared to my Dolby Digital upscaled DVD.

However, there is a different in picture quality between an older movie upgraded to BD and a new movie released originally in BD.

Twister picture can be a bit grainy compared to LA Battlefield. But It was still clearer than the old DVD. I can see frackles on Helen Hunt's face hehehehe.

The remote on Oppo is well laid out and huge buttons with backlight. I like.

Now is the time for me to update the settings for my Logitech Harmony 1000i remote to incorporate the Yamaha and Oppo.

Thursday, 11 August 2011

Musical Fidelity M1 CDT


The main reason I want to test this unit is because I am intrigued of the 'balanced' set up. (Note: I have not purchased this unit. Its on loan for demo). Good question on the price. I have not asked. If I only decide to buy after the demo, I will know the price. Reason being is that, I do not want to get influenced by the price tag to evaluate the unit. Some people will tend to say a unit is good just becauce the price tag is above RM10K and anything below that is crap. So might as well I dont ask the price. But I feel that it will sell at about RM4K.

Now about the balance, a few months back when I purchased my M6i amp, I posed a question on XLR connection in this forum where I connect my M1 DAC to the M6i using XLR. However, I was feeding the M1 DAC with a signal via coaxial from XRayV3. So, the conclusion I got from this was that my set up was still not truly balanced. Some say XLR connection is only needed for long runs of cable and cheap units are not truly balanced eventhough there is an XLR connection offered on the unit etc. But I am still intrigued by the question whether a fully balanced unit is superior than the common RCA connection.

So, I was thinking whether to go for an M3 or M6 CDP. However, M3 does not offer XLR digital connection and M6 will make my M1 DAC redundant. Hence, when the CDT came into the market last month, I feel like testing and compare it with XRayV3.

Built

Being in the M1 series, its definitely very lightweight. It still has the sexy black look similar to my other M series kit. Size is similar to CLiC and M1 DAC which it then compliment each other. It has a standby button which I like as I dont really like leaving the CDP to be on all the time.The button lay out on the front fascia is well laid oout and very intuitive. The display is of a bright greyish green. It is a bit too bright at night and it could have been better if the design came with a dimmer like the XrayV3. I am leaving the plastic cover on the display as I may decide not to buy the unit.

The remote feels cheap though, similar to CLiC. The difference between an M1 and M3 or M6 series are significant and it can be seen on the remote. Luckily enough my M6i remote can also control this unit, so I repacked the CDT remote into the bubble wrap.

The AES, coaxial and optical sockets are well laid out and firmly fitted. There is also 2 triggers where you can conncet any additonal device for power that can be run on 12V I think (have to recheck)

Loading mechanism

The CDT has a slot in mechanism which takes you away from the traditional tray loading. So no worries on mechanical failure there. However, I was listening to 10 different CDs last night and today and twice I encountered that the unit rejected the CD after loading. It ejects the CD automatically but no issues on the second attempt.

The loading however is very quiet and it will read the TOC of the CD as fast as 2 seconds.

CD format

It offers CD Text and can play CDR and CDRW. One bonus point over the XrayV3.

Hook up

I connected the CDT to M1 DAC using one side of VDH The Second XLR cable and from the M1 DAC to M6i amp, I used Siltech Classic XLR cable.

For the XrayV3, it is connected as follows:

1. Via coaxial into M1 DAC using Cambridge Audio digital cable and via Siltech XLR above into M6i
2. Via X-10D V3 using QED Signature IC into the the X-10D V3 and also into the M6i amp

The session

The test tracks:

1. Andrea Bocelli - Time to Say Goodbye
2. Janet Seidl - Till I Have You
3. My Hero - Foo Fighters

Volume was set at my normal listening level - 9 o'clock on the dial.

The unit is brand new, so I guess it needs burning in first. So I wasnt expecting anything major improvement. But lo and behold, the instant I put on Andrea, the room was fill with music. There was this liveliness injected that I though I was listening to a concert version of the track. I immediately change the CD into my XRay V3 just to make sure my mind was not playing a trick on me. I first tested via X10D.

And yes, it did not. There is a big different in the high notes. The CDT gave a brighter presentation of Andrea's vocal and the accompanied musical instrument in which it can be a little overwhelming. I guess the this is because the X10D does inject warmness to the music. But it was still much livelier than going via X10D. And the loudness of course is lesser than the XLR connection.

I then switched the XRay V3 to the coaxial via M1 DAC. Here is when the difference is not that transparent. I kept repeating the track and switching between CDT and XRayV3. Although the liveliness, the CDT wins hands on, but the clarity and detail, cant hear much different.

Same goes for the low end notes. On the track My Hero, the bass drum on both XRayV3 and CDT, provide justice to the ProAc. Bass was full, taut and very controlled.

Putting on Janet Seidl (a HDCD), provides the same presentation between both. I could start comparing them with HDCD decoding via my X-DAC, but it was 1 am, so NO.

I went to bed by putting on the Andrea Bocelli CD on shuffle repeat. I concluded that digitally, there is not much different between a coaxial and XLR connection. But somehow, the CDT added the liveliness.

Same story the next day? Nope. A big nope. After running in for about 12 hours, the liveliness of the CDT is more uplifitng and the high end notes were less harsh. I repeatted the above tests and found:

1. The CDT provides a much more open presentation of the music, with maintaining the similar level of detail and clarity from XRayV3
2. The low end notes on both units are very controlled and defined. It made the ProAc seems larger than its size.
3. The 'analogue' connection via X10DV3, although sounds very warm, now seems lacking in liveliness. Warm is important to me but now it sounds rather flat. Ooohhh is the X10D V3 going to be on sale soon? Heheheh.

Conclusion

Hhhmmmmm a tough one. Do I replace the less than a year old XRayV3 with the CDT? Is it really an upgrade? Or I am just going parallel and just want to really believe that XLR/AES digital connection is superior than coaxial and optical, especially that this set up will define that my system is truly balanced? Or do I really want to buy in to the believe that separate transport and DAC provides a better set up?

Too soon to answer hhehehe. Give me a few more weeks with this unit.

Maybe will try it with a Hari Raya song. Now where is my P. Ramlee CD.